
Battlefield 3 features a wide variety of weapon attachments for most of the weapons that are available to you. Ranging from sights, to barrels, to bipods, each weapon has a number of attachments that can be unlocked by playing with that particular weapon. Below you’ll find a comprehensive list of Battlefield 3 weapon attachments along with some instructions on how to use them and comparisons of their benefits.
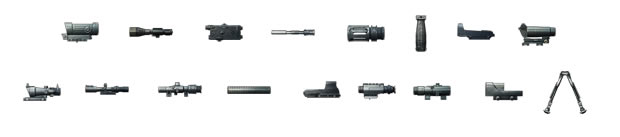
- Sights/optics
- Under barrel attachments: Foregrip, Underslung rail, M320 Grenade Launcher, Bipod, Tactical Light, Laser Sight
- Barrel attachments: Heavy Barrel, Suppressor, Flash Suppressor
- Other attachments: Extended Mag, Straight Pull Bolt
Sights/optics
ACOG 4X
The ACOG 4X zoom is often the first attachment unlocked for assault rifles. It’s a 4X zoom sight that doesn’t reflect or glare, thereby doesn’t give away your position to the enemy.
Ballistic sight, 12X
The Ballistic sight offers a powerful 12X magnification and is best suited for sniper rifles. However, enemies can easily spot you due to its powerful glint.
Reflex RDS
The Reflex RDS sight offers no zoom but is very useful in tight quarters where precision and reaction times are important.
IRNV Infrared sight
The IRNV Infrared sight brings infrared capabilities, making it easy to pick out enemies from the environment. It has a 1X zoom.
PKS-07, 7X
The Russian-made PKS-07 comes with 7X zoom and is the standard scope op Russian-made sniper rifles.
M145, 3.4X
The M145 has a slightly less powerful zoom (3.4X) than the ACOG 4X, but offers better visibility and is better suited for in-door combat.
PSO-1, 4X
The PSO-1 is the Russian answer to the ACOG 4X, and works in much the same way, offering the same zoom and aiming capabilities.
HOLO Holographic sight
The HOLO is the main holographic sight for the US forces.
PKA-S, Holographic
The PKA-S is the Russian answer to the American HOLO sight, and works in much the same way.
KOBRA, RDS
The KOBRA RDS is the Russian answer to the American Reflex RDS sight, and is nearly identical in its function, although its appearance is quite different.
PK-A, 3.4X
The PK-A is the Russian counterpart to the M145, and offers the same zoom and features.
Under barrel attachments
Foregrip
The foregrip increases accuracy by decreasing horizontal spray when used on assault rifles and sniper rifles.
The Foregrip reduces horizontal sway from firing your weapon. Automatic guns will have the most horizontal sway, making the Foregrip a good choice for any automatic. There is no real downside to using this attachment. You would pick this over the extended mag if you were doing a lot of mid-ranged combat with an Assault Rifle or Light Machine Gun.
For weapons that can use it (not every weapon can) the Battlefield 3 Foregrip is one of the first attachments you will unlock. You get it just by getting 40 or so kills with your weapon of choice.
The Foregrip is a really good weapon attachment for any automatic or semi-automatic weapon. It makes shooting players at any range much easier. Anything which increases your ability to aim is an excellent customization to have.
In fact, the Foregrip is so good I would recommend it for all players in any situation. If you are using a gun that can have the Foregrip, it is definitely something you will want to use. The Foregrip should be your default attachment, and you should only use the other primary weapon attachments if you have a specific reason for doing so (i.e. using the Extended Magazine for a short-ranged combat build).
One of the best ways you can use the Foregrip is for pushing the limits of the range of an Assault Rifle or other ranged automatic or semi-automatic weapon. You can add on a Heavy Barrel and combine that with the Foregrip. This results in increased accuracy, less horizontal drift, but more vertical climb.
Since Vertical Climb reverts to normal as soon as you stop firing and the foregrip practically removes horizontal drift, these two together make it very easy to shoot targets at your weapon’s max distance.
What you want to do is set your gun to single or burst-fire (turn off automatic mode) and just fire out bullets one or two at a time. Pause very briefly in between shots, just long enough for the gun’s vertical climb to fall back down. You can usually get off 3-4 shots (more than enough to take out an enemy) in a second – just pause very briefly and its all you need to counter the vertical climb of the Heavy Barrel.
Without the Foregrip, many guns would drift too far to the right or left in between shots so you would actually have to aim again before shooting, which is what makes the Foregrip so good for this purpose.
Underslung Rail
The Underslung Rail allows you to attach things like the M320 to the bottom of your gun. This is a basic attachment for Engineers and allows you to use the Grenade Launcher while you have your gun out (as opposed to switching weapons which takes longer).
The main downside to using the Underslung Rail is that you cannot equip a Foregrip at the same time. The Foregrip is a great accessory and really increases the accuracy of your gun throughout longer fire-fights.
The Underslung Rail is the default option on many guns. If you do not see the Underslung Rail on your gun of choice, it is likely that the particular weapon in question is unable to use this particular accessory.
The reasons for using the Underslung Rail are certainly the most straight-forward of any of the weapon attachments: so you can access your Shotgun or M320 and related other explosive weapons easier.
As a result, if you use your grenade or rocket launchers (when applicable) frequently, you will want to use an Underslung Rail to make using them easier. If you are not the type of player who makes much use out of ballistics, then there is no real point behind this attachment for Engineers.
Likewise for Assault players, you may want to use the Underslung Rail to attach a Shotgun. This will naturally make you more effective at short-range combat.
Of course, you actually have some of these ballistics or shotguns unlocked or be playing an Engineer or Assault class in order to actually make use out of this attachment.
Another good reason to use the Underslung Rail is to use Smoke Grenades with the M320. These are probably the most potent weapon in the entire game for Rush mode strategy. What you do is launch smoke grenades at an objective you are trying to cap. Your team can then run in and cap it and your enemy will not be able to stop them since they cannot defeat them due to smoke.
M320 Grenade launcher
The M320 grenade launcher is unlocked for assault rifles and can be used with a frag round, shotgun round, or smoke round:
- M320 – Launches a frag grenade which explodes on impact. If you hit a player with this, it is nearly always a 1-hit kill.
- M320 Dart – Essentially acts just like a shotgun. Turn this on when you want to bust into a crowded room.
- M320 Smoke – Launches a smoke grenade. This is a great item to help take down objectives on Rush.
The M320 is unlocked within the Assault Kit by leveling up. It may be available in other kits, but it is not something leveled merely by kills with a specific gun or by leveling up your overall job level.
The M320 really is a great utility weapon to have access to. The default M320 which has a frag grenade on it is best for just general Team or Squad Deathmatch where you want to take out as many enemy players as you can. You only get a few shots with it per spawn, but you can definitely take players down with it.
The M320 Dart is something you can switch to whenever you are fighting in a tight space or if you are guarding a door while your team is in the top of a building. It works best when you make your Assault Rifle a little more oriented for long-range attacks.
You do not need to worry about close-range attacks when you are using a Shotgun attachment, so there you can focus your other attachments on ranged attacks by using a scope and heavy barrel. Alternatively, you could put on a Tactical Light so you could essentially have a shotgun class with a tactical light that still has long-ranged capabilities.
Finally, you have the M320 Smoke, which is excellent in Rush games. You want to use this to create smoke around objectives when on offense. This allows your team to run in and arm the M-COMs and makes it very hard for the enemy to see you when you are capping them. You can also do this on defense when disarming an M-COM – once it has been capped, throw down a bunch of smoke grenades and start capping.
Bipod
The bipod is available for assault rifles, sniper rifles and light machine guns and. When mounted on a surface, it greatly reduces recoil and increases accuracy.
The Bipod is a Sniper Rifle attachment which significantly reduces the kickback you get from shooting the Sniper Rifle. More importantly though, it eliminates the drifting of the scope when you are zoomed in. Normally if you aim with a Sniper Rifle, the scope moves a small amount constantly. The Bipod stops this.
The only downside to using the Bipod is that you have to actually be laying down prone with a flat surface in front of you for the Bipod to take effect. This naturally limits your mobility, but nothing is stopping you from dropping prone when you need to make a long shot and then getting up and moving on.
The Bipod is one of the first things you unlock when using a Sniper Rifle. Just get a handful of kills with any Sniper Rifle (that can equip the Bipod) and you will unlock it in no time at all.
Since the Bipod requires you to lay down to use it, it does take a little bit of planning to use. However, the gains from actually using it are well worth it, depending on the map.
What a lot of players do is when they reach an area with low cover is to actually go prone and then slowly back up. This will let you get the bipod set up and allow you to back up just enough to get a good angle on your opponent. Players often do this when engaged in a really tight, narrow area, such as the metro tunnels in Operation Metro.
However, the very best players do not rely entirely on the Bipod and only use it when they have to make a really long shot. If you are at mid-range, you can simply aim, get a head shot, and keep moving. Standing still in an exposed position, even if you are laying prone, is just an easy way to get killed.
Tactical light
The tactical light is a powerful flashlight which can be attached to all weapons, including pistols. Other than making it possible to see in the dark, the flashlight can be used to blind opponents as well.
The Tactical Light’s effectiveness depends on the proximity and level of brightness of the map. The closer you are to your target, the brighter and more intense the blinding effect is. If you are far away, the tactical light typically does not do much except let the enemy know where you are.
Additionally, the darker the area, the more intense the Tactical Light shines. If you use your Tactical Light outside, it hardly does anything aside from give away your position. However, if you use it in a dark area like the metro tunnels in Operation Metro, it completely blinds your opponent and practically removes all of their vision (if you are close).
As mentioned earlier in the guide, the Tactical Light has the major downside of giving away your position. This is not just like the Laser Sight which lets your opponents know they are being targeted but rather a bright light which can be seen by all players around you. You cannot sneak around behind walls and through cover with a Tactical Light.
Note that you can press “up” on the directional pad to turn on and off the tactical light. When you are sprinting it should always be off, and when you are about to engage in combat you can turn it back on.
You can unlock the Battlefield 3 Tactical Light just like any other secondary weapon attachment – by getting kills with the gun you want to unlock it on. It only takes about 100 kills or so to get a Tactical Light (varies gun to gun) as it is (I believe) one of your first 5 unlocks, regardless of weapon.
Now that you know what the Tactical Light does and what its downsides are, we are ready to discuss strategy. The first thing is that I need to re-emphasize how easily the light gives away your position. It is like a beacon that lets everyone know exactly where you are. You can only sneak up on players from behind with a Tactical Light – you will never creep through brush and approach from the front.
The other thing that should be re-emphasized is that the Tactical Light’s effectiveness is dependent upon the brightness of the area. On any bright outdoor maps (like the first portion of Operation Metro) you never want to use a Tactical Light. It just gives your position away and it is so bright outside it does not blind anyone.
Additionally, remember that the further you are from your opponents, the less effective the light is. As a result, you never want to engage in long range combat with a Tactical Light. It just shows the opponents where you are and does nothing to blind the enemy.
For this reason, I think a tactical light is best to use in indoors fights which involve a lot of closer quarter’s fighting. Use an automatic weapon and bust into crowded rooms, using your light to blind the opponent and then take them out before they can recover.
Laser sight
The laser sight emits a powerful laser which is useful and increases accuracy when firing the weapon from the hip / unscoped. however, the laser also easily gives away your position.
As an added side effect, your laser slightly blinds the target if you shine it on their face. It is not quite as strong as the tactical light, but it can blur the vision a bit. You have to be very accurate when you point it though as the laser beam is very tight.
The blinding effect of course lets your opponent know that you are aiming at them. In my opinion, this alert is actually more detrimental than the blinding effect is a positive. It allows players to duck out of range before you can shoot.
This is amplified by distance. The further you are from your opponent, the more the blinding effect will be a warning rather than a bonus for you.
You unlock the Laser Sight just like all other secondary weapon attachments – by getting more kills. However, this is one of the later attachments you unlock so you will need a lot of kills with a single gun in order to unlock it. Expect to play at least for a few hours with the same gun (and not go 0-20) in order to unlock this attachment.
The Battlefield 3 Laser Sight is one of the top attachments for short to mid-ranged combatants. In fact, it is my favorite attachment when using an assault rifle or carbine in close-quarters combat (such as the metro portion of Operation Metro).
The Laser Sight is a “lite” Tactical Light – it does not blind the opponent nearly as much but it also is much less likely to give away your position to the opponent. Even when you shine the beam on your opponent’s face, it hardly tells them where you are just rather than you are aiming at them.
The Laser Sight’s real strength is for those that want to fire their gun without actually aiming. This is perfect when you are playing the Assault Class and are about to head through some close quarters as you advance on enemy territory.
The best way to use the Battlefield 3 Laser sight for close combat is to spray your gun (automatics work best for this) while strafing left and right. Meanwhile, you can use your aiming joystick to keep the laser centered directly over the enemy’s body. You will take them out in a second or two and can dodge most bullets due to your strafing.
An Assault Rifle with a Laser Sight can handle even players that are camping. The only real thing that stops this in close combat is if you get too close to a person using a Shotgun with Buckshot. You can of course beat players using a Shotgun by keeping your range. With the Laser Sight, you would be surprised at how far away you can take down players without actually aiming your Assault Rifle.
This is best combined with an automatic gun which has a low kickback such as the M416. You do not want to have an Assault Rifle with a lot of kickback like the M16A3 or AK-74Mas this will mess up your aim. Of course good players can make these work, but its much easier and more effective to use an M416.
Combine your Laser Sight with a Foregrip for best results. The reduction in horizontal kick makes it much easier to keep your Laser Sight aimed on the target while spraying your gun and strafing.
A lot of players think that the Laser Sight will somehow improve their aim when attacking from a very long range. This is not the case because in Battlefield 3, Snipers have to account for bullet drop. This means that if you fire at a player across the map, you will have to aim slightly above his head as gravity will pull the bullet towards the ground as it speeds across the map.
This means that your laser is not accurate from a very long distance, so there is no point in even trying to use it for these types of attacks. You will only let your opponent know that he is being targeted, which gives him time to go prone and take cover.
Barrel attachments
Heavy barrel
The heavy barrel, available for assault rifles, increases long-distance accuracy, but the trade off is that it’s less usability in close ranges.
As a downside, the Heavy Barrel significantly increases vertical climb. When you fire this gun, you will get a lot of vertical kickback. You cannot spray bullets with this active or your aim will be off very quickly.
The Heavy Barrel is one of the first things you will unlock with your gun, should it be capable of using it (not every gun can equip this). Once you get about 20 or 30 kills with a gun, you should have access to this. You have to unlock the Heavy Barrel for each gun you use though – unlocking it once only gives it to you on that particular weapon.
The Heavy Barrel is a very effective add-on, depending on the weapon, combat preference, and map. Many players are able to successfully use this add-on.
Due to the high vertical climb, you cannot accurately shoot multiple bullets at once when using the heavy barrel. You may get away with a 2 or 3-round burst, but you cannot hold down the trigger. I recommend turning off automatic mode if possible. You can do this by pressing down on the directional pad on your controller. This will turn your gun to single-shot or burst fire.
Once you do turn on single-fire, it becomes very accurate and the kickback is not all that significant. There is no horizontal climb with a heavy barrel, so if you fire off bullets in 1/3-1/2 second intervals, you do not even notice the kickback.
For best results, combine the Heavy Barrel with the Foregrip (which reduces horizontal kickback). When you combine the two along with just using single shots, your gun becomes much more accurate with little to no kickback.
Think of the Heavy Barrel as the complete opposite of the Flash Suppressor – it is something you use when you are pushing the limits of the range of your gun. The Flash Suppressor is good when you are fighting on the short-end of your gun’s range, whereas the Heavy Barrel is perfect for long-ranged combat.
It increases your accuracy at the cost of not being able to fire multiple bullets at once, but single target shots work best anyway at a far range so it is not a hindrance at all.
If you are playing rush mode where the map and terrain changes with each objective, be sure to swap this out where appropriate. For example, the heavy barrel is great for the initial portion of Operation Metro, but when you actually hit the metro station, a laser sight, flash suppressor, or tactical light is a much more appropriate attachment.
Suppressor
The suppressor is available on most rifles and sniper rifles, reduces the noise and reduces the muzzle flash when equipped.
The downside to using the suppressor is it reduces your accuracy, range, and even bullet speed. This means if you are sniping with a Suppressor, you will have to account for more bullet drop than normal. The Suppressor reduces accuracy and range to the point where it is not really a viable attachment for long-ranged combat.
Unlocking the Battlefield 3 Suppressor can be done just by getting kills with your gun. You unlock the Suppressor pretty late, so you will have to use the same gun for quite a few matches before you get access to this weapon attachment. This varies from weapon to weapon as some weapons have less attachments that they can use.
Many players get a bit confused about the difference between the Suppressor and the Flash Suppressor. Both are secondary weapon attachments and serve similar functions, but the best way to use them is quite different.
The Suppressor removes muzzle flash (the actual fire and explosion you see when someone shoots their gun) as well as significantly reduces the sound your bullets make. The Flash Suppressor only removes muzzle flash and does nothing to actually silence your bullets.
Why would you use the Flash Suppressor then? Well, the Suppressor has the side effect of reducing the accuracy and range of your bullets, whereas the Flash Suppressor only reduces accuracy and has no significant effect on range.
This means that if you are using a Suppressor, you will have trouble hitting players from range. Your bullets will not travel as far or as accurately.
The best time to use the Battlefield 3 Suppressor is in close-quarters combat when you want to sneak up on your enemies. It is ideal for a build which relies on sneaking up on opponents. You are better off with something like a Laser Sight if you are looking to head in from the front – as if the players can see you coming, why bother with a Suppressor? Its function is to keep you hidden.
As a result, you will want to use the Suppressor should you be trying to flank your enemy. This is good for flushing out snipers as well as marking enemy players once you are behind enemy lines. From a safe position, you can mark enemies for your team while you take out anyone who gets too close without actually giving away your position.
In order to help foster this goal, Sprint Specialization is actually a pretty good combo for a Suppressor. This way you can move around more quickly and easily behind enemy lines.
There is no real point in using a Suppressor for long-ranged combat. It reduces your accuracy too much and has no real function. Players will not really be able to hear your gunfire anyway from across the map, so a Flash Suppressor is more than adequate to keep your position hidden should you be attacking from range.
Flash suppressor
Unlike the regular suppressor, the flash suppressor doesn’t dampen the noise, but it greatly reduces the flash weapons give off, while still retaining the same damage inflicted to opponents. The major downside to using a Flash Suppressor is that it reduces your accuracy, especially over long distances.
Since the Flash Suppressor reduces accuracy, and accuracy is something the best players all prize, its usefulness is fairly limited. You never want to snipe from a distance with a Flash Suppressor as it reduces your accuracy too much – a good Sniper only needs a single shot, and you do not want your Suppressor ruining your head shots.
The best time to use a Flash Suppressor is when you are shooting your weapon at a range well within its accuracy. For example, a lot of players use Sniper Rifles at mid-range. If you are one of these people, a Flash Suppressor goes well because your gun is more than accurate enough at that position.
An example of this would be recon players working through the second and third stages of Operation Metro in rush mode. Since the quarters are fairly tight and the rooms are dark, a Flash Suppressor can really come in handy. You will rarely attack from long-range here, and the Flash Suppressor helps keep you hidden as the muzzle flash in the dark metro area gives away your position.
Other attachments
Extended mag
The extended magazine is available so SMGs (sub machine guns) and offers a larger magazine holding more ammunition per clip.
The Extended Mag is a weapon clip which expands your magazine size by 50%. This would give your AK-74M 46 bullets per clip (45 in the clip and 1 in the chamber) instead of 31 (30 in the clip and 1 in the chamber).
This is good when you are fighting in very short ranged combat and are doing a lot of shooting from the hip against multiple opponents. You need more bullets for short-ranged fighting that than mid or long-range combat.
Unlocking it is easy – just get kills with your weapon of choice. You unlock a new customization every 10-20 kills. The Extended Mag is not one of the first attachments you get so it will take a bit to get this for your gun of choice.
So now that you know what the Extended Mag does and how to unlock it, you are ready to learn the best time to use it. The truth is the Extended Mag is only useful if you have a very specific sort of playstyle – short-ranged combat with a lot of shooting from the hip with an automatic weapon. Additionally, it can be very beneficial for slow-loading weapons like Sniper Rifles. Let’s examine both cases below:
The first situation involves someone using an automatic weapon to shoot opponents from the hip while strafing side to side. This makes it hard to be hit with bullets, but also decreases your accuracy. If you shoot from a short range though, it works great and you can often take down multiple players. The biggest downside is that you use a lot of bullets with such an approach. That is why the Extended Mag is good for this sort of playstyle.
The other situation is when you are using something like a Sniper Rifle which has a very long reload time. This gives lets you stay in the fight 50% longer before you have to take cover and reload, which can make a huge difference for pro snipers who do not need much time to aim and don’t have a use for a Bipod.
Straight Pull Bolt
The Straight Pull Bolt allows you to reload your Sniper Rifle when completely zoomed in on bolt-action rifles. Normally you have to stop aiming in order to reload the bullet. Most good players prefer the Bipod over this, as you should only need 1 shot to take your opponent out, and you move the trigger much faster when you aren’t zoomed in for the next target while you are loading the next bullet.
The Straight Pull Bolt is one of the later attachments you get for your Sniper Rifle and is unlocked via kills. Just keep using the rifle you like and as you rack up kills you will eventually unlock this.
The Straight Pull Bolt is something that allows you to essentially take multiple shots at an enemy without zooming out. This allows you to track them for long distances as you fire at them.
Personally, I don’t really like the idea behind this attachment because the whole point of using a Sniper Rifle is to go for head shots so you can take out the opponent in one hit. The whole point of using a Bolt-Action Rifle is so you have more power and accuracy than the semi-automatic versions. What is the point of using a bolt-action if you are not going to take opponents out in 1 hit?
One argument would be that when you are shooting over a very long range, you do not always get one hit kills. While this is true, when you are shooting from a very long range, you should be using a bipod anyway.
The best Snipers though do not shoot from too far away anyway though and prefer to go for mid-ranged combat. In this situation, the Straight Pull Bolt is not all that great either as you do not have time to stay zoomed in for long periods. You have to be the master of 1-shot kills to make a close-range Sniping class work.
With that in mind, the Straight Pull Bolt does help with practice. Since you get more shots off when using it, you will get more practice with aiming a Sniper Rifle. For this reason, it will give you more shots (which is more practice) and may speed up the learning time involved in getting used to a new Sniper Rifle.
Additionally, one situation where the Straight Pull Bolt may shine is if you are fighting in mid-ranged combat and there are multiple enemies in the same spot – you can move from one to the next without having to zoom out. However, the downside here is that moving your aim is pretty slow when zoomed in. If the players are any distance apart, you are best off zooming out and re-aiming once you get into the right area.
If you have ever seen screen-recordings of the best snipers, they are constantly zooming in, getting a 1-shot kill, then zooming out and immediately zooming back in again. They only zoom in for a brief second for the accuracy boost, and spend most of their time not zoomed in so they can see what is going on around them.
Source: Battlefieldstrategyguide
flashlights still blind pretty effectively even in outdoor daylight
Thanks for this info, really cool!
Straight Bolt Pull > Bipod, the Bipod makes you a stationary target and is slower for a follow up shot, not every sniper shot will be a 1 shot kill. thus missing the opportunity to have a follow up kill shot.
You can elminate sway on sniper rifles without having to equip a bipod by holding your breath, you do this by pushing L3 button on PS3
I read that they were changing some of the attachment flaws and advantages. It had percentages for loss of hip fire accracyy and aim accuricy ect.. but it said they were going to and I can’t find what they ended up doing.. u know?
Terrible guide for bolt action vs bipod. Your argument is invalid since a majority of players won’t have time for headaches everytime. The bolt action is obviously better. Allowing you to fight more targets in a smaller amount of time. The bipod just does what holding down the sprint button would do.
Headshots, headshots, headshots, video games are OBSESSED with this, it’s just not f’n true. Snipers shoot center mass, and that’s more than enough, that’s why we bother to carry the ammo we do in the first place. Trust me. However, not the point. Bipods, strait pull bolts. People these are situational as is everything else in life. Use the bipod for the long shots, the stability it offers is essential. I’m talking the 800m+ because yeah they are possible and they are fun! They are not BS, they aren’t easy and if you can pull that off consistently, the hoorah for you. Best snipers, mid range combat? That’s total bull for infantrymen trying to talk you into getting closer. Don’t buy that trash. Snipers are observers that’s your REAL job, being a team player, making the call outs, maybe not getting the kills every time, but with practice you’ll get some for yourself. Sometimes the tangos get too close, it happens depending on the map. So using the bolt in this situation helps for rapid follow up, that means more suppressive ability especially with the suppression perk. You’re providing very accurate heavy suppressive fire hurting their ability to shoot your buddies and occasionally killing one or two. Being a sniper takes LOTS of patience and selflessness (it’s not always about you). Skill yeah, but that’s less important, since with enough practice even a monkey can write Mozart. If you lack the pervious two attributes, maybe this isn’t for you, and that’s why there are 3 other classes to choose from.
Flash supp and heavy barrel are only not accurate when fired from the hip, it explains it in the discription. If your aiming down sight then you shouldnt have a problem with accuracy depending on how you control your shots.
how do we use the attachment?